
ElasticSearch ve XenForo — Neden Önemli?
XenForo'nun yerleşik MySQL tabanlı araması küçük topluluklarda yeterli olsa da binlerce konu, yüz binlerce mesaj barındıran ileri seviyede toplulukların ihtiyaçlarını karşılayamaz. Sorgular yavaşlar, alaka sıralaması zayıflar ve sunucu yükü artar. XenForo Enhanced Search eklentisiyle birlikte kullanılan ElasticSearch, foruma cümle düzeyinde alakalı, milisaniyelik sonuçlar veren bir arama deneyimi kazandırır.Bu rehberde AlmaLinux 8/9 üzerinde ElasticSearch 8.x kurulumunun pratik adımlarını paylaşıyoruz. Test edilmiş ve bizim AIOR forum altyapımızda da kullandığımız yöntemdir.
Ön Hazırlık
ElasticSearch JVM tabanlı çalışır, en az 2 GB RAM önerilir; üretim ortamı için 4 GB+ tavsiye edilir. Sunucunuza SSH ile root kullanıcısı olarak bağlanın:
Code:
ssh root@sunucu-ipSistem paketlerini güncelleyin ve eski kurulumlardan kalan parçaları temizleyin:
Code:
sudo dnf update -y
sudo dnf clean all
sudo dnf remove elasticsearch -y
ElasticSearch Repository'sini Ekleme
Elastic.co resmi GPG anahtarını içe aktarıp yum repo dosyasını oluşturuyoruz:
Code:
rpm --import https://artifacts.elastic.co/GPG-KEY-elasticsearch

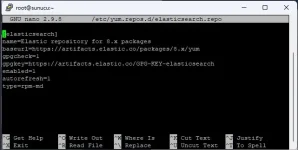
cat > /etc/yum.repos.d/elasticsearch.repo <<EOF
[elasticsearch]
name=Elasticsearch repository for 8.x packages
baseurl=https://artifacts.elastic.co/packages/8.x/yum
gpgcheck=1
gpgkey=https://artifacts.elastic.co/GPG-KEY-elasticsearch
enabled=0
autorefresh=1
type=rpm-md
EOF
Kurulum ve İlk Çalıştırma
Repo'yu etkinleştirip ElasticSearch'i kuruyoruz:
Code:
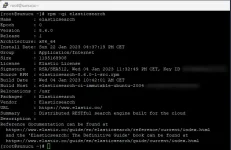
sudo dnf install --enablerepo=elasticsearch elasticsearch -yKurulum tamamlandığında üretilen elastic kullanıcı şifresini, kayıt token'ını ve sertifika parmak izini bir yere not edin — daha sonra XenForo arayüzünden bağlantı için gerekecek.
Servisi başlatın ve sistem yeniden başlatıldığında otomatik açılması için etkinleştirin:
Code:
sudo systemctl daemon-reload
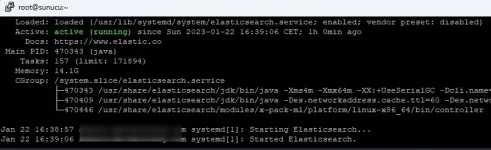
sudo systemctl enable --now elasticsearch
Servisin sağlıklı çalıştığını doğrulayın:
Code:
curl --cacert /etc/elasticsearch/certs/http_ca.crt -u elastic https://localhost:9200JSON formatında küme bilgilerini gördüğünüzde kurulum başarılıdır.
Güvenlik ve Erişim Kontrolü
ElasticSearch asla internete açık olarak çalıştırılmamalıdır. /etc/elasticsearch/elasticsearch.yml dosyasında network.host: 127.0.0.1 olarak ayarlayın; XenForo aynı sunucuda barındırılıyorsa localhost yeterlidir. Farklı sunucudaysa SSH tüneli veya VPN üzerinden erişin.JVM heap boyutunu sunucu RAM'inin yarısına ayarlayın (/etc/elasticsearch/jvm.options.d/heap.options içinde -Xms2g / -Xmx2g). Çok yüksek değerler garbage collector duraklamalarına neden olur.
XenForo Tarafında Bağlantı
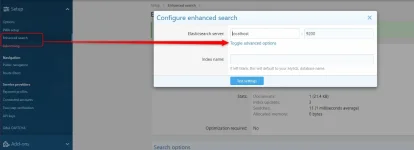
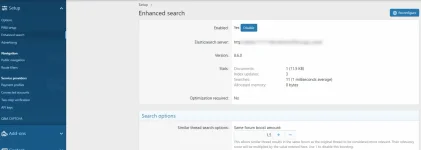
XenForo Admin > Add-ons menüsünden Enhanced Search eklentisini kurun. Ardından Setup > Options > Enhanced Search altında host, port, kullanıcı adı, şifre ve SSL sertifika parmak izini girin. "Test connection" butonu ile bağlantıyı doğrulayın, sonrasında Tools > Rebuild caches > Rebuild search index adımıyla mevcut tüm konuları yeniden indeksleyin.Sık Karşılaşılan Sorunlar
Bind error: 9200 portunun başka bir servis tarafından kullanılmadığından emin olun. SSL hatası: sertifika parmak izini doğru kopyaladığınızdan emin olun. Bellek hatası: vm.max_map_count=262144 kernel parametresini /etc/sysctl.conf dosyasına ekleyin.AIOR Hosting paketlerinde ElasticSearch ile çalışan XenForo siteleri için VPS ve özel sunucu çözümlerimiz mevcuttur; kurulum desteğini de paket içinde sunuyoruz.
Why ElasticSearch Matters for XenForo
XenForo's built-in MySQL-based search is sufficient for small communities, but once you grow into the tens of thousands of threads and hundreds of thousands of posts, relevance, latency and server load all suffer. With the XenForo Enhanced Search add-on backed by ElasticSearch, you get sentence-level relevance and millisecond-class results — even on massive forums.This guide walks through a practical AlmaLinux 8/9 installation of ElasticSearch 8.x. The procedure is the same one we use on our own AIOR community forum.
Prerequisites
ElasticSearch runs on the JVM and needs at least 2 GB of RAM, with 4 GB recommended for production. Connect to your server as root over SSH:
Code:
ssh root@your-server-ipUpdate system packages and remove any stale ElasticSearch installs:
Code:
sudo dnf update -y
sudo dnf clean all
sudo dnf remove elasticsearch -y
Adding the Repository
Import Elastic.co's official GPG key and create the yum repo file:
Code:
rpm --import https://artifacts.elastic.co/GPG-KEY-elasticsearch

cat > /etc/yum.repos.d/elasticsearch.repo <<EOF
[elasticsearch]
name=Elasticsearch repository for 8.x packages
baseurl=https://artifacts.elastic.co/packages/8.x/yum
gpgcheck=1
gpgkey=https://artifacts.elastic.co/GPG-KEY-elasticsearch
enabled=0
autorefresh=1
type=rpm-md
EOF
Install and First Run
Enable the repo and install ElasticSearch:
Code:
sudo dnf install --enablerepo=elasticsearch elasticsearch -yWhen the installer finishes it prints the generated elastic superuser password, the enrolment token and the HTTP certificate fingerprint. Note all three — you will need them shortly when connecting XenForo.
Start the service and enable it on boot:
Code:
sudo systemctl daemon-reload
sudo systemctl enable --now elasticsearch
Verify the service is healthy:
Code:
curl --cacert /etc/elasticsearch/certs/http_ca.crt -u elastic https://localhost:9200A JSON cluster info response means the install succeeded.
Security and Access
ElasticSearch must never be exposed to the public internet. In /etc/elasticsearch/elasticsearch.yml set network.host: 127.0.0.1; if XenForo lives on the same server, localhost is enough. For a separate server, tunnel over SSH or VPN.Set the JVM heap to roughly half of physical RAM via /etc/elasticsearch/jvm.options.d/heap.options (-Xms2g / -Xmx2g). Going too high triggers long garbage-collector pauses that hurt search latency.
Connecting From XenForo
Install the Enhanced Search add-on in XenForo Admin > Add-ons. Then go to Setup > Options > Enhanced Search and supply host, port, username, password and the SSL certificate fingerprint. Hit "Test connection" to confirm, then run Tools > Rebuild caches > Rebuild search index to reindex existing content.Common Pitfalls
Port bind error: make sure nothing else listens on 9200. SSL error: re-copy the certificate fingerprint carefully. Memory error on startup: add vm.max_map_count=262144 to /etc/sysctl.conf (kernel mapping limit).For XenForo communities backed by ElasticSearch, AIOR Hosting offers VPS and dedicated server plans with installation support included.